Far beyond the realms of ordinary existence, an extraordinary event unfolded—a celestial alignment of unparalleled wonder that sent ripples through the cosmos. It was during this vibrant astral convergence that the universe itself decided to rewrite the rules of fate. Out of swirling stardust and cosmic whimsy, the ancient pug gods stirred, channeling otherworldly power into five select warriors destined for eternal battle. Thus was born Pug Wars, an interstellar contest where strategy, luck, and the indomitable pug spirit intertwine with the roll of a die.
The Chosen Five
From every corner of the galaxy came the chosen pugs, each one a living embodiment of cosmic forces and playful mischief:
Potato: Endowed with the deep, unwavering gravitas of ancient celestial bodies, Potato is a symbol of enduring strength and steady resilience. His robust frame carries not only physical might but an inner calm reminiscent of a world that has witnessed countless cosmic cycles.
Lily: Like the comet’s tail that illuminates the dark, Lily is nimble, enchanting, and quick-witted. With a spirit as bright as a nebula and a charm that disarms even the most hardened warrior, she dances through battle with a grace that belies her tactical acumen.
Bongo: A supernova of energy and fervor, Bongo radiates explosive power and unpredictable intensity. His battles are like meteor storms—frenzied bursts of raw force that can either leave a trail of victory or a cloud of chaos in their wake.
Mr. Twill: The embodiment of cosmic precision, Mr. Twill mirrors the disciplined orbits of distant planets. Possessing a keen mind and refined tactics, he treats each conflict as a chess match among the stars, where every move is calculated and every swing of his cane is steeped in the wisdom of the cosmos.
Selah: Channeling the gentle balance of the universe, Selah is as soothing as the quiet glow of a far-off quasar. With the ability to heal and harmonize, she brings equilibrium to the battlefield, ensuring that the fierce energy of her foes is met with a counterbalance of calm, restorative power.
The Cosmic Ritual
At the moment of convergence, ancient runes etched in stardust foretold the coming of a grand contest. It was not simply a contest of might or strategy—it was a ritualistic celebration of chance and destiny. The pug gods decreed that every battle would be marked by the universal randomness of fate—a simple roll of a die would remind the warriors (and the cosmos itself) that even the mightiest plan may succumb to the unpredictable nature of existence.
Every pug’s destiny would be influenced by this randomness:
A well-timed roll could unleash Potato’s unstoppable might or amplify Bongo’s explosive fury.
An unexpected twist of fate could turn Lily’s graceful maneuver into a miraculous escape, or allow Mr. Twill’s precise strike to pierce even the sturdiest defense.
And in moments of despair, Selah’s life-giving howl could reverse the tide of battle, proving that balance always finds a way.
A New Age of Battle
Today, as legends of the Cosmic Convergence echo through digital realms and animated screens, Pug Wars stands as a testament to that timeless moment. In the modern era, where technology interweaves with myth, players from around the globe step into the pawprints of these celestial heroes. Every battle becomes a microcosm of the vast universe—a strategic contest where every roll of the die brings a new chance, every move is a dance between destiny and decision, and every pug is a hero in their own right.
As you engage in battle, remember that you are not merely playing a game, but participating in an ongoing cosmic ritual. With every match, you evoke the ancient energies of the universe—a playful reminder that fate is fickle, but the spirit of the pug endures eternally. In Pug Wars, destiny awaits with every roll, every card, and every courageous pug that steps onto the cosmic stage.
Step forward, champion—embrace the Cosmic Pug Convergence, and let the stars decide your fate!
Pug Wars: Comprehensive Game Manual
Pug Wars is a light-hearted 1v1 battle card game where adorable yet fierce pugs face off in comedic combat. This document is divided into four sections:
- Full Gameplay Manual: Detailed rules and mechanics of Pug Wars.
- Comprehensive Character Manual: Stats and move lists for the five playable pugs (Potato, Lily, Bongo, Mr. Twill, and Selah).
- Quick Start Manual: A beginner-friendly guide to start playing quickly.
- Quick Start Character Manual: One-page summaries of each character for new players.
Designed for both casual fun and competitive strategy, Pug Wars combines simple dice-driven mechanics with strategic depth. The tone is humorous and light, but under the fluff lies a balanced game of tactics and luck. It’s also designed to be web-friendly: straightforward enough to implement digitally, yet nuanced enough to remain engaging.
Full Gameplay Manual
Game Overview and Objective
Pug Wars is a turn-based duel between two players, each controlling a unique pug character with distinct stats and abilities. Players take turns playing cards (actions) to attack their opponent or use special moves. The goal is to reduce your opponent’s Health (HP) to zero, thereby winning the match. Matches are typically quick (a few minutes) but packed with funny moments and strategic decisions.
Components
- Character Cards: Each player selects one of the five pug characters. The character card lists that pug’s base stats (Health, Power, Defense, Attack) and describes their moves.
- Move Cards: For each character, there are four move cards: one Basic Attack, two Unique Moves, and one Special Move. These cards detail the effects and any dice rolls required. In a physical game, players can have these cards in hand or on the table for reference. In a digital/web game, these would be clickable actions.
- Dice: A six-sided die (d6) is used to introduce randomness into attacks and abilities. (Optionally, two dice or different dice may be used for certain moves as specified.)
- Tokens/Markers: (Optional) Tokens can help track one-time Special move usage and temporary effects. For example, you might place a token on a character who has used their Special (to remind that it’s unavailable), or use markers to note a temporary buff/debuff on a character.
Core Stats and Mechanics
Each pug character has four core stats that define their strengths and playstyle:
- Health (HP): The amount of damage a pug can withstand. If a character’s HP reaches 0, that pug is knocked out and loses the game.
- Power (POW): The pug’s general attack power and skill with abilities. This stat is used to calculate damage for most attacks. Higher Power means higher damage output.
- Defense (DEF): The pug’s ability to resist damage. Defense is subtracted from incoming attack calculations, reducing damage taken.
- Attack (ATK): A measure of the pug’s aggressiveness and agility. In the core game, Attack can be used for determining certain effects (like breaking ties for who goes first) and is referenced by specific abilities. (For simplicity, most damage calculations use the Power stat, but some moves may use the Attack stat instead for variety.)
These stats interact in combat. For example, a high Power character can deal more damage, but a high Defense opponent can mitigate that damage. All characters’ stats are balanced such that no pug has a strictly dominant stat line — each has advantages and weaknesses (see Character Manual for the stat table).
Turn Structure
A Pug Wars duel proceeds in rounds of turns:
- Start of Game: Both players roll the d6 (or flip a coin) to determine who takes the first turn (high roll goes first). Optionally, players can agree that the pug with the higher Attack (ATK) stat goes first, reflecting its quickness. This can add a strategic element to character choice but is not required.
- Player’s Turn: On your turn, you may perform one action by playing one of your move cards:
- Basic Attack (always available).
- One of your two Unique Moves (always available, unless a move’s description imposes a cooldown or limited use).
- Special Move (once-per-game; if you’ve already used it, it’s no longer available).
- You cannot play more than one card in a turn, but you may choose not to play any move (for instance, if a move’s effect was set up on a previous turn like a counter, or simply for strategic reasons).
- Resolving Actions: After choosing a move, declare it and follow the card’s instructions:
- Attacks and damage-dealing moves: Roll the die and calculate damage or effect as the card directs (see “Attacks and Damage” below for the basic rules). Apply the result to the opponent (subtract HP, etc.).
- Status or buff moves: Apply any effects (e.g. healing, defense boosts for yourself, debuffs on the opponent). Use tokens or notes to remember effects that last beyond the turn.
- Many moves involve a dice roll to introduce a random factor (for example, determining damage or whether an effect succeeds).
- Apply Damage/Effects: Subtract any damage dealt from the target’s Health. If an effect alters stats (temporarily or permanently), note the new stat for the affected character.
- Check Win Condition: If a player’s Health drops to 0 or below, the game ends immediately and that player loses. Otherwise, continue.
- End of Turn: The turn ends after the action is resolved. Any temporary effects that expire at end of turn or start of next turn are handled. Then it becomes the other player’s turn.
- Repeat Rounds: Players alternate turns, each using one move per turn, until one pug is knocked out.
Throughout the game, both players will decide when to use basic attacks versus unique or special moves. Timing and strategy are key — especially because Special Moves can only be used once.
Attacks and Damage Calculation
Combat in Pug Wars is centered on using moves to reduce the opponent’s Health. Here’s how attacks work:
- Basic Attack: The most common attack which each pug can use each turn. By default, its damage = Attacker’s Power – Defender’s Defense + 1d6 (die roll). For example, if your pug’s Power is 8 and the enemy’s Defense is 3, and you roll a 4 on the die, you would deal (8 – 3 + 4) = 9 damage. (Always deal at least 0 damage; if the calculation goes negative, treat it as 0 instead of healing your foe!)
- Fairness Note: The random roll (1-6) adds unpredictability, but the difference between the characters’ Power and Defense sets a baseline. A stronger pug will usually deal more damage than a weaker one, even with a low roll, ensuring skill and stats matter.
- Unique Moves: Unique moves may also deal damage, often with bonus effects or different formulas:
- Some unique attacks might use the same formula as the basic attack (Power – Defense + die) but with a twist (extra damage, multiple hits, status effects, etc.).
- A few moves might use other calculations. For instance, a move could specify “use Attack stat instead of Power” or “ignore the opponent’s Defense” for that attack. Each unique move card will explain its damage calculation and effects. These moves introduce creative randomness, like additional dice rolls or conditional outcomes (e.g., “if the die rolls a 6, do extra damage”).
- Special Moves: Special moves are one-time powerful actions. They generally have higher damage potential or strong effects:
- Most Special Moves use an enhanced damage roll (for example, rolling two dice for damage instead of one) or a higher flat bonus. This makes them more impactful than regular attacks.
- Specials often include a unique advantage on top of damage (knockdown, stun, self-heal, stat debuff, etc.).
- Because they can only be used once, there’s no randomness in availability — both players know each has one “ultimate” to unleash, but not when. The timing of using a Special adds strategy and mind-games.
All damage in Pug Wars is subject to a bit of luck from dice, but extreme luck is mitigated by the stats. Even a low roll on a strong pug will do respectable damage, and a high roll on a weak attack won’t one-shot an opponent from full health. This balance keeps gameplay feeling fair.
Unique Moves and Special Moves
Aside from basic attacks, each pug has:
- Two Unique Moves: These are character-specific abilities that provide flavor and tactical options. Unique moves can range from defensive maneuvers, multi-hit combos, status effects (like stunning an opponent or buffing oneself), to risky high-reward attacks. They can be used any number of times (unless otherwise specified), but only one per turn. Unique moves often incorporate randomness to keep things interesting (for example, a chance to inflict an effect or variable damage outcomes). Reading the move card will tell you exactly what the move does.
- One Special Move: This is the character’s signature “finishing” move, usable only once per game. Special Moves tend to have high impact – they can swing the momentum or clinch a victory. Because they’re so powerful, using them at the right moment is crucial. Each Special Move has some unique advantage (massive damage, guaranteed stun, etc.) and may involve extra dice or special conditions. After a Special Move is used, it cannot be used again in that match (in a physical game, the Special move card could be flipped or removed from play to indicate it’s spent).
Using Special Moves: Since they are one-time, players often save them for critical moments (for instance, to finish off a weakened foe or to make a comeback when low on health). There’s a psychological aspect: both players know a big move is in each other’s back pocket. This can create bluffing or anticipation in competitive play.
Status Effects and Buffs/Debuffs
Some moves cause status effects or temporary stat changes:
- Stun (Skip Turn): The affected pug loses their next turn. (They essentially sit idle, perhaps seeing stars from a heavy hit or being charmed by cuteness.) Stuns wear off after causing the skipped turn. To keep things fair, most stuns in Pug Wars are either chance-based or on one-use moves, so you can’t lock someone out of play repeatedly.
- Defense Buff: Increases a pug’s Defense temporarily (until a certain number of turns or attacks pass). This reduces damage from incoming attacks. For example, a move might grant “+2 DEF until your next turn,” meaning the pug is harder to hurt for one opponent’s attack.
- Power Buff: Temporarily increases a pug’s Power (or Attack) for a short duration or for the next attack only. This can make the pug’s next attack hit harder.
- Debuffs: The opposite of buffs – for instance, a move might cause an opponent to have “-2 Power on their next attack” or lower their Defense briefly. Debuffs wear off after their duration (often one turn or one attack).
- Healing: A few moves allow a pug to regain some Health. Healing is always limited (small random amounts or conditional) to prevent prolonging the game indefinitely. Using a turn to heal is a strategic choice – you recover HP but also give the opponent a chance to act next.
All such effects will be clearly stated on the move card. If two effects conflict (unlikely in this simple design), the one played later takes priority, or they both apply in their respective ways if possible. No effect lasts more than a couple of turns unless explicitly stated (Special move effects might be an exception if noted).
Introducing Randomness Fairly
Randomness in Pug Wars comes primarily from dice rolls, which add fun uncertainty:
- Damage Rolls: Almost every attack has a dice component (usually 1d6) so that damage isn’t the same every time. This prevents the game from feeling too deterministic or repetitive. A weaker character can roll high and a stronger one roll low, but across a match these tend to even out. The Defense stat ensures even a high roll from a low-Power pug won’t deal absurd damage – it will be mitigated by the opponent’s defense. Likewise, a low roll when you have a strong Power stat still yields moderate damage. This design ensures no one loses solely due to a couple of unlucky rolls; strategy and stat advantages carry weight.
- Random Effects: Some unique moves have chance-based outcomes (for example, “40% chance to stun” or “on a roll of 5-6, this move does extra damage”). These are designed with balance in mind. Generally, if a move has a chance to inflict a strong effect, it will do only modest damage on its own, so even if it fails, the user isn’t completely wasting their turn — and if it succeeds, they gain an advantage without outright winning instantly (unless the opponent was already on the brink of defeat).
- Mitigating Unfairness: To keep things fair, Pug Wars avoids “all or nothing” randomness as much as possible. For instance, rather than a move that either completely misses or fully hits for huge damage, most moves provide at least a small effect even on a “fail” roll. Example: one character’s stun move still does a bit of damage even if the stun doesn’t land, so the turn isn’t entirely lost. This design philosophy keeps players engaged; a run of bad luck is unlikely to leave you helpless.
- Strategic Use of Luck: Players can strategize around randomness. For example, if your opponent’s Special Move is a big damage attack with two dice, you might buff your defense in anticipation to blunt its impact, reducing the swing of a high roll. Likewise, if you have a move that is risky (high reward on a good roll, but some penalty on a bad roll), you can save it for when you’re slightly behind (to gamble on a comeback) or when you’re comfortably ahead (and can afford the risk). The random factors encourage adaptive play — players must be ready to respond to unexpectedly high or low damage outcomes.
Overall, luck plays a role but smart play is rewarded. Each character’s design ensures that no one relies purely on luck; their moves give them tools to handle various situations. Skilled players will manage risk (deciding when to gamble on a big roll or when to play it safe with a guaranteed small effect). This blend of skill and luck makes Pug Wars exciting and replayable, without making outcomes feel unjust.
Winning the Game
The win condition in Pug Wars is straightforward: reduce the opponent’s Health to 0 (or below). The moment a pug’s HP hits 0, the match ends immediately and the other player is victorious. There are no ties in standard play:
- If by some rare occurrence both pugs reach 0 in the same action (for example, one character’s special causes both fighters to be knocked out simultaneously), you can consider it a dramatic double knockout. In casual play, this can be a draw or you can do a “sudden death” overtime (perhaps each pug resets at 10 HP and you continue). In competitive play, a tournament might declare a double KO as a draw and have the players rematch.
- There is no point scoring or alternative win condition — just good old-fashioned pug pugilism until one pug drops!
Players should shake hands (or paws) after a match and perhaps swap characters for a rematch to try out different strategies.
Quick Start Manual
New to Pug Wars? This quick start guide will have you and a friend battling pugs in no time! This section strips down the rules to the essentials so you can jump straight into the action. Once you get the hang of the basics, you can refer to the full manuals for more detailed nuances.
Objective
Knock out your opponent’s pug by reducing their Health to 0. Each player controls one pug with its own stats and special moves. Last pug standing wins!
Setup
- Choose Characters: Each player picks one of the five pugs (Potato, Lily, Bongo, Mr. Twill, or Selah). Take that character’s card and their four move cards (Basic Attack + 2 Unique moves + 1 Special move).
- Set Health: Both players set their starting Health to the value on their character card (e.g., Potato starts at 35 HP, Lily at 30 HP, etc.).
- Decide First Turn: Roll a die each; high roll goes first. (Alternatively, flip a coin or agree that the pug with the higher Attack stat starts first.)
- Prepare a Die: Have a six-sided die handy. You’ll roll it for most attacks and effects.
Turn Basics
Players alternate turns. On your turn:
- Choose an Action: Play one of your move cards:
- Basic Attack – your standard attack (can be used every turn).
- Unique Move – one of your two character-specific moves (can use either whenever, unless the card says otherwise).
- Special Move – your ultimate move (can only be used once in the whole game; after you use it, it’s gone).
- Basic Attack – your standard attack (can be used every turn).
- Resolve the Move: Follow the text on the card:
- If it deals damage, roll 1d6 (unless the card says otherwise) and calculate damage. Basic rule: Damage = your Power – opponent’s Defense + your die roll. (Don’t worry, you can quickly do the math or use the card’s help.)
- If it has a special effect (stun, heal, etc.), do what the card says. You’ll usually still roll a die to see if the effect happens or how strong it is.
- If it deals damage, roll 1d6 (unless the card says otherwise) and calculate damage. Basic rule: Damage = your Power – opponent’s Defense + your die roll. (Don’t worry, you can quickly do the math or use the card’s help.)
- Apply Results: Subtract damage from the opponent’s HP. If an effect like a stun occurs, let the opponent know (stunned means they skip their next turn). If you healed, add HP to your total (but not above your starting HP).
- End Turn: That’s it for your turn. Now the other player goes.
Attacking & Damage (Simplified)
- Basic Attack Damage: Roll 1d6 and add your Power, then subtract the opponent’s Defense. (This is the same as Power + die – Defense. If the result is less than 0, just do 0 damage.) Example: Your Power 8 minus enemy Defense 3 = 5, plus you roll a 4 → 9 damage.
- Unique Moves: These may do damage with special rules or have other effects. Read your move card. Examples: some moves hit multiple times, some may stun or heal. The card will tell you if you need to roll and how to apply the result.
- Special Move: Your one-time mega move. This usually does extra damage (often you roll two dice for damage instead of one) and/or a powerful effect. Use it when it counts, because you won’t get a second chance!
Other Rules in a Nutshell
- Stun: If your pug is stunned, you skip your next turn entirely (your pug was too dazed or charmed to act). Stun wears off after that skipped turn.
- Buffs/Debuffs: Temporary stat boosts or reductions. For example, a “+2 Defense until next turn” means you add 2 to that pug’s Defense for the specified duration. A “-2 Power on next attack” means when that character next attacks, they use 2 less Power than normal. These effects are short-lived; they usually end after the next turn or attack.
- Healing: If a move heals a pug, add that many HP (but not above their starting HP). Healing can keep you in the game longer, but remember you’re not damaging the opponent on a turn you heal.
- Winning: Keep track of both players’ HP (use paper, tokens, or mental math). When a pug’s HP hits 0 or below, that pug is knocked out and the game ends immediately – the other player wins.
Quick Tips for New Players
- Learn Your Character: Take a quick look at your character card and moves. Know your Power (damage potential) and Defense (how much you block), and glance at your unique moves to see what cool tricks you have.
- Balance Risk and Reward: If you have a move that can backfire (like Bongo hurting himself on a bad roll), use it carefully – maybe not when you’re one hit away from losing! On the flip side, if you’re behind, a risky move might be worth it to try for a comeback.
- Use Special at the Right Time: Don’t hold your Special move for too long. A good time might be when the opponent is around half health – often your Special can either finish them or swing momentum. Also consider using it if you’re about to lose; a Special could save the day.
- Stun and Debuff Timing: If you have a stun move, it’s best used right before an opponent’s turn (to make them lose that turn). Debuffs that lower enemy Power/Defense should also be timed so the enemy actually has a turn under their effect (no point weakening an enemy if they don’t plan to attack soon).
- Have Fun with the Theme: This game is meant to be funny and light. Imagine the scenarios: pugs pulling off dramatic kung-fu moves or begging adorably to distract the foe. Lean into the humor – it makes the experience better!
That’s all you need to start a basic game. Set your HP, roll to see who goes first, and enjoy the pug-on-pug mayhem! If any questions come up, the full manual above has the answers, but Pug Wars is designed to be pretty intuitive once you get going.
Pug Wars V1

Pug Wars V2

Comprehensive Character Manual
In Pug Wars, each pug warrior has a distinct personality and playstyle. This manual provides detailed profiles for the five characters: Potato, Lily, Bongo, Mr. Twill, and Selah. Despite their differences, the roster is designed so that any character can win in the right hands. Each has unique strengths and weaknesses, and part of the fun is discovering how to leverage those strengths against an opponent.
Character Base Stats
The table below summarizes the base stats for each pug. These stats are carefully balanced — generally, a character with high values in one area will be lower in another:
Character | Health (HP) | Power (POW) | Defense (DEF) | Attack (ATK) | Playstyle Summary |
Potato | 35 | 7 | 5 | 6 | High HP and defense; a durable tank who deals steady (but not huge) damage. |
Lily | 30 | 8 | 3 | 7 | Agile and tricky; solid offense but low defense. Relies on clever moves over brute force. |
Bongo | 25 | 10 | 2 | 5 | Glass cannon; extremely high power but very low defense. Big damage output, risky survival. |
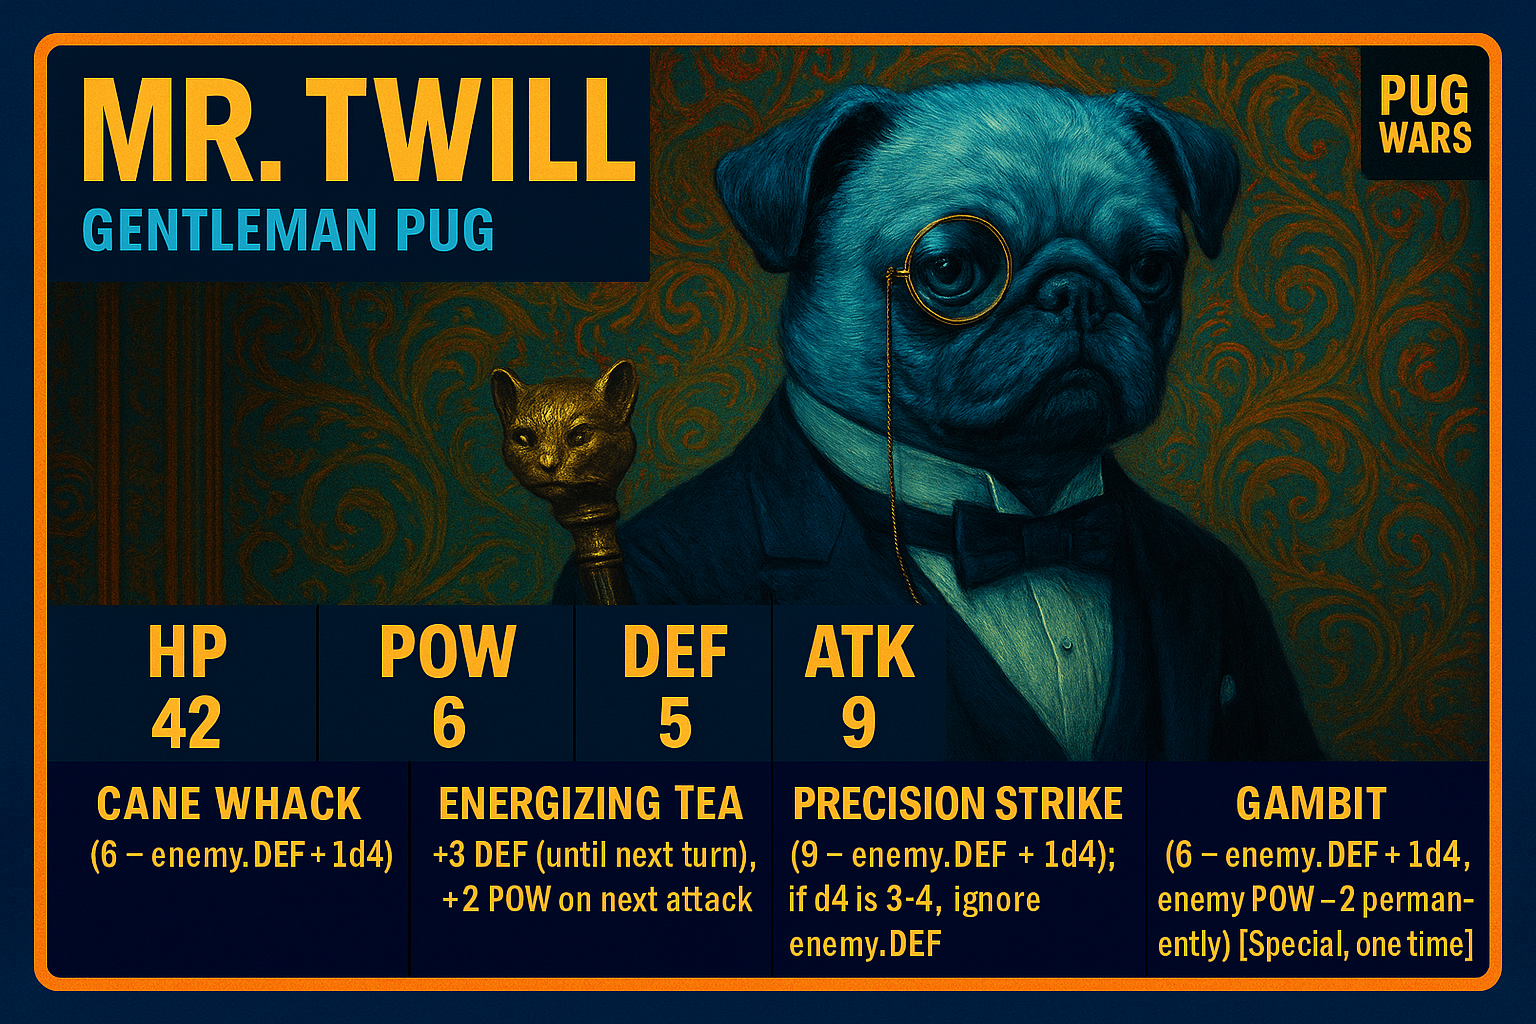
Mr. Twill | 28 | 6 | 5 | 9 | Defensive and tactical; lower raw power but high defense and precision. |
Selah | 30 | 7 | 4 | 6 | Steady and resilient; balanced stats with a mix of healing and offense. |
Potato: Highest Health and tied for highest Defense, but lower Power means his attacks aren’t the strongest. Great at soaking damage; he shines in longer fights by outlasting opponents.- Lily: Well-rounded with a lean towards offense (high Power) and agility. Her Defense is low – she can dish it out but can’t take it as well, so she uses her tricks to avoid retaliation.
- Bongo: Highest Power stat makes his attacks hit like a truck, but his low HP and DEF mean he’s fragile. He either wins fast or goes down trying, depending on his luck and timing.
- Mr. Twill: High Defense and high Attack (for precise strikes) make him tough and crafty. His Power is the lowest, so he relies on well-timed special moves and buffs to deal damage.
- Selah: Average to good in all stats, with a slight edge in Defense. Selah’s versatility and healing give her endurance; she doesn’t excel at burst damage, but she can sustain herself and outlast foes.
Each character has one Basic Attack, two Unique Moves, and one Special Move. Below, we detail each character’s moveset, including how their stats come into play and the random elements involved. (Damage formulas reference the character’s stats as listed above.)
Potato
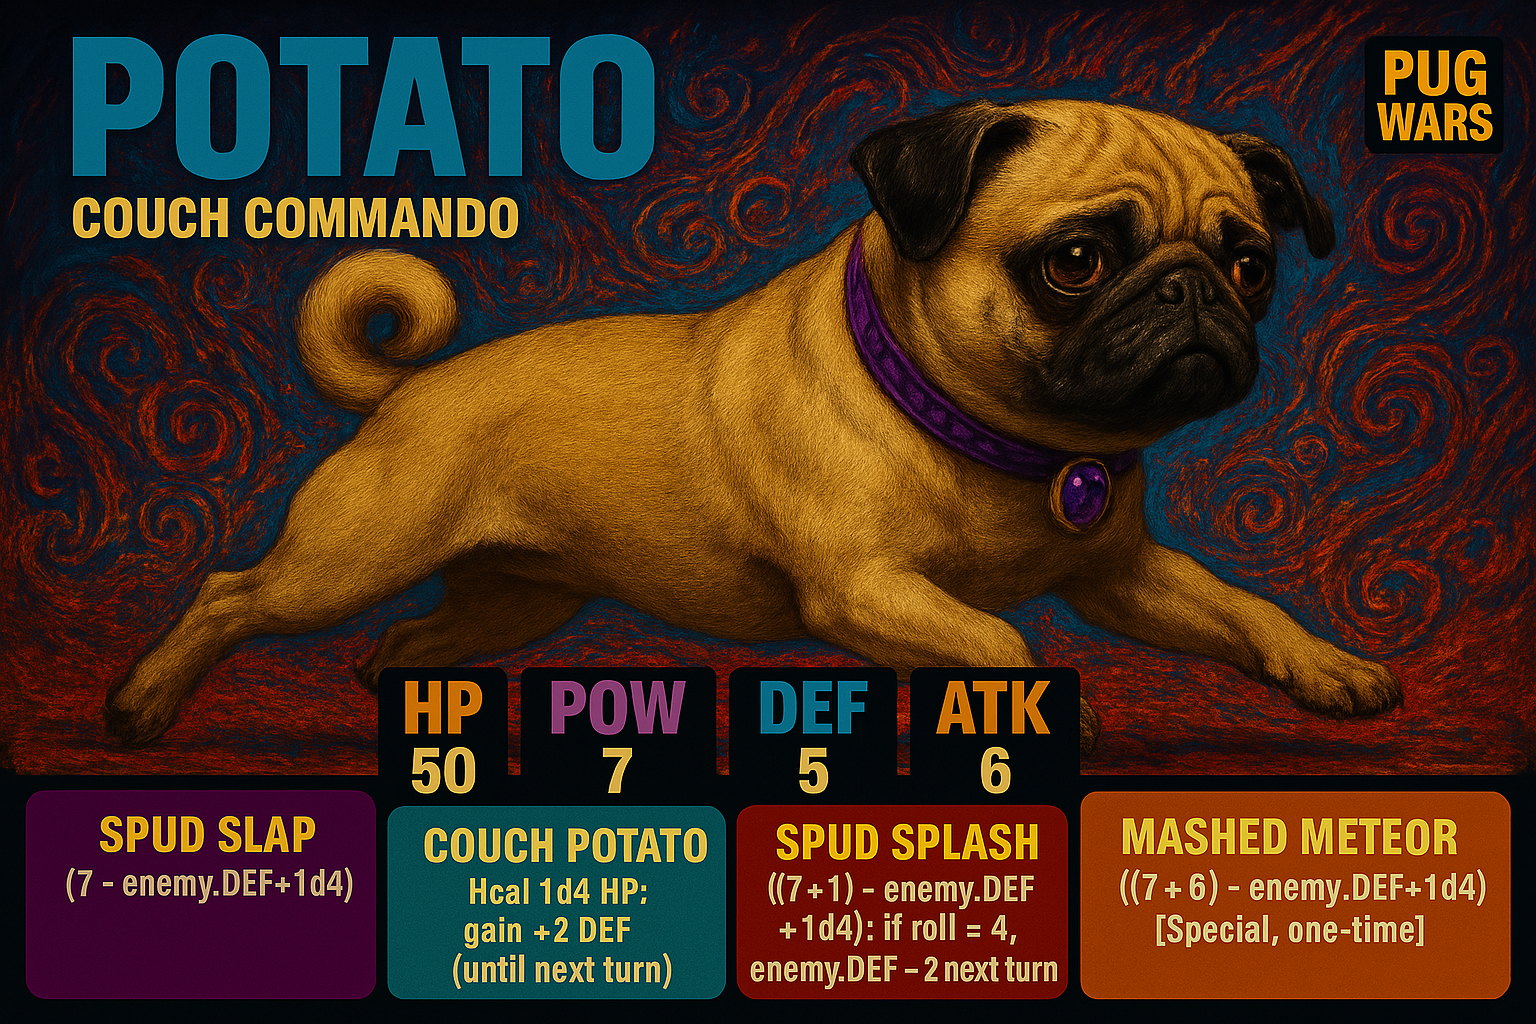
The “Couch Commando” – Potato is a chubby, laid-back pug who surprises opponents with her resilience. She might look like a couch potato, but in battle she uses his heft and love of potatoes to her advantage.
- Strengths: Very high survivability thanks to great HP and defense. Her moves can prolong the fight and wear down foes.
- Weaknesses: Lower power means she deals less damage per hit, so she must win via attrition. She’s also not very fast or fancy – her strategy is straightforward (sit tight and squash things).
Potato’s Moves:
Move | Type | Description & Effects |
Spud Slap | Basic Attack | Potato’s standard attack. She smacks the opponent with his paw (or a handy potato). Damage: Uses the basic formula (Power – opponent’s DEF + 1d6). With POW 7, her hits are moderate. No special effects on the basic attack. |
Couch Potato | Unique Move | Potato takes a moment to relax (mid-fight snack break!). Effect: Potato heals herself. Roll 1d6: he regains that many HP. He also braces herself, gaining +2 DEF until the start of his next turn (making her even harder to hurt for one incoming attack). Usage: This move uses up Potato’s turn to recover instead of dealing damage. It’s great for extending the fight so she can outlast the opponent. |
Spud Splash | Unique Move | Potato leaps up and belly-flops onto the foe, using her weight as a weapon. Damage: (Power + 1) – opponent’s DEF + 1d6. (Potato adds an extra +1 to her Power for this attack, effectively using 8 instead of 7, to represent his extra heft.) On a particularly good splash, she can shake the opponent’s defenses loose: if the d6 roll is a 6, the opponent’s armor is “mashed” – they suffer -2 DEF on their next turn only (making them easier to damage for that turn). This debuff wears off after their next turn. |
Mashed Meteor | Special Move (1×) | Potato’s ultimate move. She summons a gigantic potato from the sky and crashes it down on the opponent (don’t ask where he got it!). Damage: Very high. Calculate as (Potato’s Power + Attack) – opponent’s DEF + 2d6. With POW 7 and ATK 6, that’s like (13 – DEF + 2d6). On average, this hits hard (around 17 damage against an average DEF foe), and a lucky roll can be devastating. No additional effects – the payoff is pure damage. Strategy Tip: Because Potato’s regular damage is on the lower side, save this big smash for when it will really count (e.g. to finish off an opponent or swing momentum). |
Strategy Notes: Playing Potato means thinking long-term. Use Couch Potato when you need a breather to recover (especially if you foresee a big hit coming from your opponent next turn). Spud Splash is your go-to attack when it’s available – it does slightly more damage than a basic attack and might lower the enemy’s defense, setting them up for your next hit. Just remember, even with defense debuff, Potato’s not a burst-damage character, so be patient. Her Mashed Meteor can drastically turn the tides – often Potato can endure long enough to use it as a finisher. If you’re against Potato, try to burst her down quickly or he’ll grind you out with heals and defense.
Lily
The “Tricksy Pug” – Lily is a quick-witted, nimble pug with a mischievous streak. She fights with grace (and a bit of sass), often catching opponents off-guard with her playful tactics.
- Strengths: Good all-around stats and strong agility. She has moves that control the flow of battle (stunning or out-maneuvering the enemy) and multi-hit attacks to maximize damage.
- Weaknesses: Lily’s Defense is low – she can’t trade blows for too long. She relies on timing her stuns or quick attacks to avoid heavy retaliation. If an enemy lands a few strong hits, she’s in trouble.
Lily’s Moves:
Move | Type | Description & Effects |
Lily’s Lunge | Basic Attack | A leaping bite attack. Damage: Basic formula (Power – opponent’s DEF + 1d6). With POW 8, Lily’s base attacks pack a decent punch. No special effects on the basic lunge. |
Puppy Eyes | Unique Move | Lily unleashes an irresistibly cute sad-eyed stare. Effect: Attempt to stun the opponent with sheer adorableness. Roll 1d6: on 4–6, the opponent is stunned and will skip their next turn (they’re too charmed to attack!). On 1–3, the stun fails – the opponent shakes off the charm – but the opponent still takes 2 damage from the distraction (a minor heartache). Either way, Lily doesn’t deal her normal attack damage this turn; this move is all about trying to immobilize the foe. |
Zoomies | Unique Move | Lily zips around in a burst of speed, hitting the opponent multiple times in a single turn. Damage: Lily performs two quick strikes back-to-back. Resolve each hit as (Lily’s Power – opponent’s DEF + 1d4) damage (using a 4-sided die for each hit instead of a 6, since each individual hit is lighter than her full-strength attack). In total, on average this deals more damage than a single attack, but spread into two smaller hits. Bonus: If Lily gets especially riled up, she might get an extra hit – if both of the damage rolls come up 4 (max on the d4), she gains enough momentum for a third hit (same damage formula) in this move. This is a rare but exciting bonus. |
Cuteness Overload | Special Move (1×) | Lily’s ultimate move. She puts on an overwhelmingly adorable performance – think big puppy eyes, playful spins, maybe a tiny dance – that totally disarms the opponent. Effect: The target is stunned automatically (no die roll needed; they will skip their next turn). Damage: It also deals some damage, roughly equivalent to a normal attack (Power – DEF + 1d4). The damage isn’t huge for a Special, but that’s by design because the guaranteed stun is extremely powerful. The opponent essentially loses a turn, and Lily gets to act again before they recover. Once used, Lily can’t pull off this level of cuteness again in the same game. |
Strategy Notes: Lily thrives on outsmarting and outpacing her opponent. Use Puppy Eyes at key moments – for example, when a foe is about to use their Special or a big move, a successful stun can completely derail their plan (and even if it fails, you chip in a tiny bit of damage). Zoomies is great for laying on damage, especially if the opponent is vulnerable or low on HP – multiple hits can punch through if one alone wouldn’t be enough. Be mindful that Zoomies uses a smaller die per hit, so against a very high-defense target, sometimes one stronger hit is better; but against low defense, Zoomies shines. Cuteness Overload is your trump card to control the tempo: it can save you in a pinch (stop an opponent who would KO you next turn) or help finish an opponent (stunning them so you can land an extra hit next round). Just remember that Lily can’t take too many hits head-on, so use her mobility and stun to avoid getting into a slugfest. Keep moving and keep the opponent guessing!
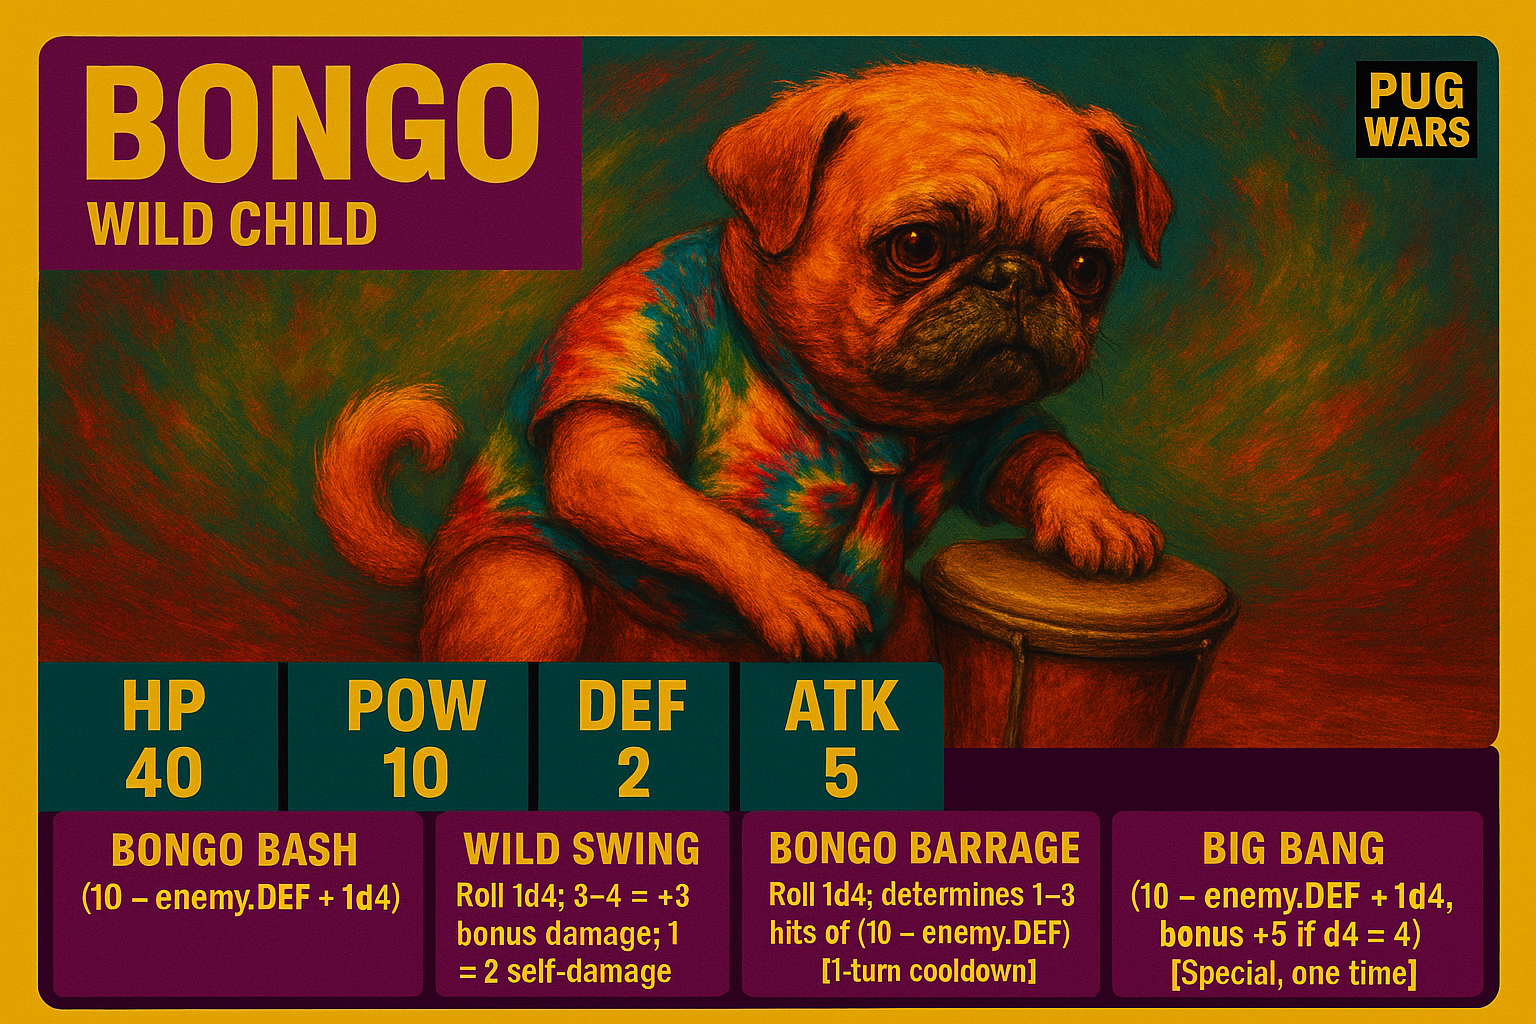
Bongo
The “Wild Child” – Bongo is a hyperactive pug who fights with reckless abandon. He’s unpredictable and full of energy, often surprising enemies with unorthodox tactics (and sometimes surprising himself!).
- Strengths: The highest Power of all pugs – his attacks can deal massive damage. He has moves that can dramatically increase damage output (multiple hits or bonus damage) and can potentially end a fight quickly.
- Weaknesses: Frail defense and low HP – Bongo doesn’t last long in a drawn-out fight. Some of his moves carry a risk (like self-damage or chance to fail), so bad luck can hurt him more than others. He’s the definition of high-risk, high-reward.
Bongo’s Moves:
Move | Type | Description & Effects |
Bongo Bash | Basic Attack | A wild swing or bite. Damage: Basic formula (Power – opponent’s DEF + 1d6). With POW 10, Bongo’s basic attack hits very hard – even if the enemy has decent DEF, he’ll carve out a big chunk. No special effect on the basic attack, aside from Bongo looking a bit crazed. |
Wild Swing | Unique Move | Bongo puts all his muscle into a reckless swing. It’s either going to really hurt the opponent or backfire a bit. Damage: First, calculate damage like a normal attack (Power – DEF + 1d6). Then apply the special gamble: If the d6 roll was 5 or 6, Bongo lands a critical hit and deals an extra +3 damage on top of the normal damage (really walloping the foe). If the d6 roll was 1 or 2, Bongo overextends and strains himself – the attack still hits for the normal damage, but Bongo takes 3 damage recoil (hurting himself in the process). On a 3–4, it’s just a regular hit with no extra effect. Essentially, one-third of the time he hits big, one-third he hurts himself a bit, one-third just normal. Note: No matter what, the opponent does take the base damage; Bongo never outright misses with Wild Swing, he just might pay a price for swinging so hard. |
Bongo Barrage | Unique Move | In a frenzy, Bongo launches a series of rapid attacks. Damage: Roll 1d6 to see how many hits Bongo lands: 1-2: 1 hit (he flubs the chain), 3-4: 2 hits, 5-6: 3 hits. Each hit deals (Bongo’s Power – opponent’s DEF) damage (no additional die per hit; think of it as Bongo’s just pummeling with raw strength each time). If he gets the full 3 hits, it’s enormous damage (three times his Power minus DEF, which could be game-ending for the opponent). If only 1 hit, it’s basically a normal attack’s worth. There’s no direct recoil or self-harm on this move, but such a wild flurry takes its toll on Bongo’s stamina – he cannot use Bongo Barrage on his next turn (essentially a 1-turn cooldown). This prevents spamming the barrage repeatedly. |
Bongo’s Big Bang | Special Move (1×) | Bongo’s final, all-in attack. He gathers every bit of his chaotic energy for a massive blow. Damage: Power – opponent’s DEF + 2d6. With POW 10, that’s 10 – DEF + two dice (range 2 to 12 from the dice). The damage output is very high and swingy. On average it’s huge, and it has a wide range of possible outcomes. But Bongo’s luck can really take it over the top: if the two dice show the same number (doubles), Bongo hits the jackpot and deals an additional +5 damage on top of the total! (Any doubles count – double 1s through double 6s all trigger the bonus. So there’s a 1 in 6 chance roughly.) This means sometimes Bongo’s Big Bang is absolutely devastating. For example, rolling 6 and 6 would yield 12 from the dice +5 bonus = 17, plus his stat difference (10 – DEF). That can flatten almost anyone. The flip side: if he rolled low (say 1 and 2, which isn’t doubles, total 3), the damage might be more moderate. Importantly, Bongo doesn’t hurt himself with this move and it never misses – it’s just variable. After using Big Bang, Bongo is out of tricks (he’s likely exhausted or out of explosives), so that’s his one shot. |
Strategy Notes: Bongo is for players who like to live on the edge. He can dish out tremendous damage, but a failed gamble can leave him vulnerable. Use Wild Swing when you feel lucky or when an extra +3 damage could secure a knockout – but be cautious using it if your own HP is very low, as the recoil might KO you! Bongo Barrage is great when any outcome is acceptable: early on, even one hit from Bongo hurts, and if you get two or three, you gain a big lead. Just remember you’ll have to do something else next turn (perhaps a Wild Swing or basic attack) before you can barrage again. When playing Bongo, often the best defense is a good offense – consider using Bongo’s Big Bang as soon as you see an opportunity to either finish the opponent or bring them to the brink. Waiting too long to use it could result in Bongo getting knocked out before he unleashes it. If you’re against Bongo, try to weather the storm – if you can survive his crazy output, he has the least durability, and a Bongo who’s out of tricks (or unlucky) is easy to take down.
Mr. Twill
The “Gentleman Pug” – Mr. Twill is an old-fashioned pug with a monocle, top hat, and refined manners. Don’t be fooled by his polite exterior; in battle he is shrewd and calculating. He prefers tactics and technique over brute force.
- Strengths: High Defense makes him naturally tanky. His Attack stat is high, and he has moves that leverage precision (using Attack instead of Power, or ignoring opponent’s defense). He can also buff himself to further increase defense or damage. Overall, very tactical options.
- Weaknesses: Low Power means his basic attacks are weak. He doesn’t have any direct healing, so his durability is all in damage reduction. If an opponent can bypass his defenses or out-buff him, he can fall behind. He requires foresight – he’s not about quick KOs, but outmaneuvering the opponent.
Mr. Twill’s Moves:
Move | Type | Description & Effects |
Cane Whack | Basic Attack | A refined yet forceful cane strike. Damage: Basic formula (Power – opponent’s DEF + 1d6). Mr. Twill’s POW is 6, the lowest among the pugs, so his basic attacks don’t hit hard (especially against high-DEF foes). No special effect on the basic attack. |
Energizing Tea | Unique Move | Mr. Twill pauses to sip a cup of his special blend of tea, fortifying himself. Effect: Grants +3 DEF and +2 Power to Mr. Twill, but only temporarily. The +3 DEF buff lasts until the end of his next turn (so it will help against one or two incoming attacks, depending on turn order). The +2 Power boost applies to Mr. Twill’s next attack (whenever it occurs). Essentially, he turtles up and charges up. This move does no damage on the turn it’s used (he’s busy drinking tea!), but sets him up to take less damage and hit harder on his following turn. |
Precision Strike | Unique Move | Mr. Twill carefully aims and strikes a weak point with his cane. Damage: This attack uses Mr. Twill’s Attack (ATK) stat instead of Power for calculating damage, showcasing his finesse. So base damage = (Mr. Twill’s ATK – opponent’s DEF + 1d6). With ATK 9, this is a stronger baseline than his normal attack (which uses POW 6). Additionally, there’s a chance of a perfect strike: Roll 1d6 – on 4–6, the attack ignores the opponent’s Defense entirely (treat opponent’s DEF as 0 for this damage calculation). On 1–3, it’s a normal hit (DEF applies). Either way, using the higher stat means Mr. Twill will deal solid damage, especially if the foe has high DEF. This move lets Mr. Twill punch through an opponent’s defenses that would normally blunt his low Power attacks. |
Gentleman’s Gambit | Special Move (1×) | Mr. Twill’s ultimate stratagem. He plays his trump card (perhaps literally pulling an ace from his sleeve or orchestrating a cunning feint) to dramatically turn the tables. Damage: A calculated blow dealing Power – opponent’s DEF + 2d6 (with POW 6, so baseline 6 – DEF + 2–12). Not the highest raw damage among specials, but respectable. Special Effect: Mr. Twill’s display of wit demoralizes the opponent, causing the opponent’s Power stat to permanently drop by 2 for the rest of the game. (It’s like he’s undermined their confidence or strategy – they just can’t hit as hard after witnessing his gambit.) This debuff applies after the damage is dealt. Even if the damage doesn’t finish the opponent, they’ll be weaker going forward. This can completely swing a fight in attrition: the enemy will do less damage with every attack after this. (If the opponent had 8 Power, now they have 6, etc. It can’t go below 0 of course.) Once per game only. |
Strategy Notes: Mr. Twill is all about playing the long game and exploiting weaknesses. Use Energizing Tea at a time when you can afford not to attack for a turn – often right before you expect to be hit (to boost DEF) or when you plan a big move next turn (to boost Power). The tea’s effect makes him temporarily one of the hardest to damage characters, and it makes his next attack surprisingly strong. That pairs perfectly with Precision Strike: ideally, drink tea one turn, then Precision Strike the next with the Power bonus – you’ll deal hefty damage, especially if you roll to ignore defense. Precision Strike on its own is your best attack option most of the time, especially against tanky foes like Potato or Mr. Twill himself (mirrors match!). Gentleman’s Gambit is best used when you either can finish an opponent with it or survive longer than them by using the debuff. For example, if you’re facing a high-Power opponent like Bongo or Lily, unleashing the Gambit early will drop their Power, making the remainder of the fight easier for you. If you’re facing a foe with lower Power, you might save it as a finishing blow. Remember, Mr. Twill doesn’t have healing, but his high DEF (plus tea buff) means he can absorb hits; combine that with lowering the opponent’s damage (via Gambit or via eliminating them quickly), and he will often win by being the last pug standing. Patience and timing are your best friends when piloting Mr. Twill.
Selah
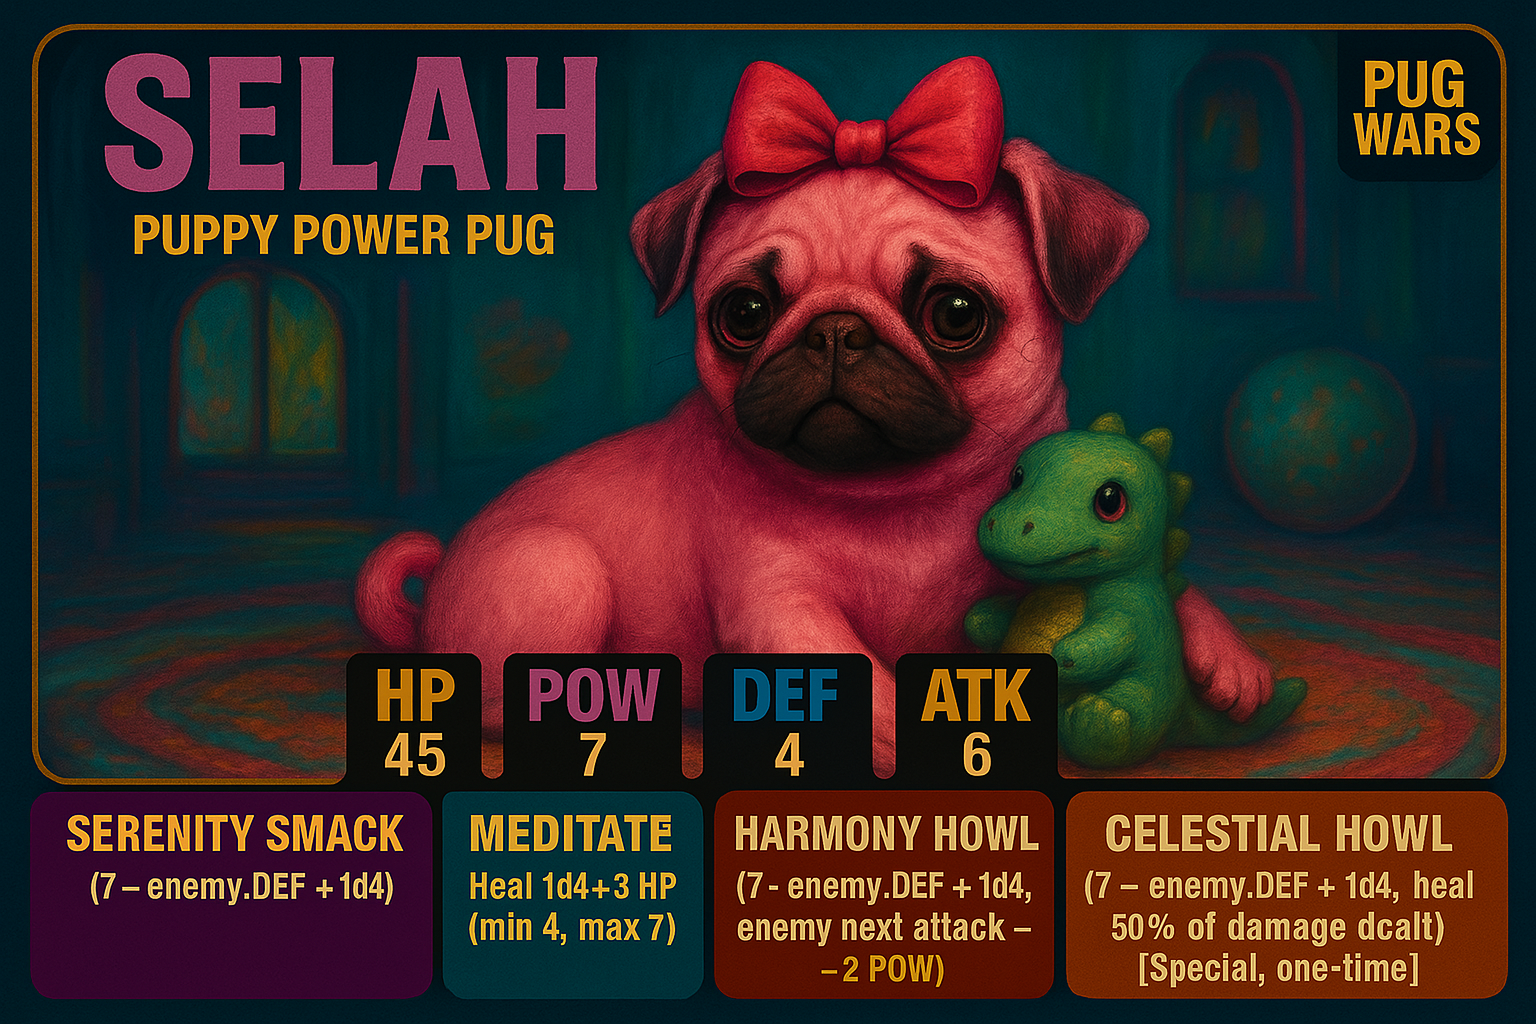
The “Zen Pug” – Selah is a calm and kind-hearted pug who taps into a serene, almost mystical vibe in combat. She fights with a harmonious balance – a bit of offense, a bit of support, always trying to find the perfect rhythm.
- Strengths: Balanced stats make her adaptable. She has the unique ability to heal herself mid-fight, giving her great longevity. She can also weaken the enemy’s attacks, making it harder for them to bring her down. Overall, she’s very forgiving to play; mistakes can be corrected by healing if timed well.
- Weaknesses: She doesn’t excel at burst damage – her offense is the same or lower than others of similar durability. If an opponent can output damage faster than she can heal or mitigate, she can be overwhelmed. Also, her best moves often don’t do as much damage themselves (because they focus on healing or debuffing), so it can take her longer to win.
Selah’s Moves:
Move | Type | Description & Effects |
Serenity Smack | Basic Attack | A measured, well-balanced strike. Damage: Basic formula (Power – opponent’s DEF + 1d6). Selah’s POW 7 yields moderate damage per hit. No special effect on the basic smack. |
Meditate | Unique Move | Selah closes her eyes and takes a deep breath, focusing inward. Effect: She heals herself instead of attacking. Roll 1d6 and add 3: Selah regains that much HP (minimum 4, max 9). No other effects – this is a straightforward recovery move. Using it ends her turn (she doesn’t attack that round). This can significantly extend the game by undoing some of the opponent’s hard work. |
Harmony Howl | Unique Move | Selah releases a resonant howl that carries a calming, weakening energy. Damage: (Power – opponent’s DEF + 1d6) – essentially a normal attack in terms of damage. Effect: The howl dampens the opponent’s aggression: the target suffers -2 Power on their next turn’s attack. In other words, whatever attack they do next, calculate it as if their Power were 2 points lower (they’ve been mellowed out). This debuff wears off right after their next attack (it’s temporary). There’s no die roll needed for the debuff; it will happen if the move hits. This move lets Selah trade damage and also soften the enemy’s next blow, which can be a lifesaver if used before a big enemy turn. |
Celestial Howl | Special Move (1×) | Selah taps into cosmic energy and lets out a powerful, echoing howl that reverberates with life force. Damage: (Power – opponent’s DEF + 2d6). With POW 7, that’s moderate base plus two dice, comparable to other characters’ specials in raw damage. Special Effect: Selah heals herself for half of the damage dealt by this move. This is a life-draining attack: she siphons the opponent’s vitality. For example, if it deals 14 damage, Selah heals 7 HP. (Round halves up if needed. Also, she can’t exceed her starting HP; any healing beyond full is wasted.) This move can dramatically swing the battle: it simultaneously hurts the opponent and heals Selah. Timing is key – using it when Selah is wounded maximizes the benefit. |
Strategy Notes: Selah is the queen of patience and balance. Use Meditate when your HP is getting low but you believe you can survive until your next turn after healing (you don’t want to heal and then immediately get knocked out). Well-timed healing can force aggressive opponents to start over in trying to wear you down. Harmony Howl is an excellent tool to preempt an enemy’s strong turn – for instance, if you suspect they’ll use a Special or a big attack next, reducing their Power by 2 could be the difference between survival and defeat. It also deals damage, so you’re not falling too far behind when you use it. Across the fight, alternate between dealing damage and using your support moves to keep yourself in good shape. Celestial Howl is best used when it will have maximum impact – typically when you’re moderately or critically wounded and the opponent has enough HP for you to siphon (if they’re down to like 5 HP, the heal is trivial, so it might be overkill). For example, if both you and your opponent are around half HP, Celestial Howl can greatly swing that gap in your favor, possibly finishing them while bringing you back to high HP. Keep in mind: if you rely too much on healing and not enough on ending the fight, you could still lose (the opponent might crit or have some huge turn). Selah’s goal is to methodically outlast the opponent, not necessarily out-damage them. In a long, drawn-out duel, Selah shines.
Quick Start Character Manual
This section provides a one-page style summary for each pug character – perfect for quickly checking what your character can do (or what your opponent is capable of) at a glance. Stats and moves are listed with brief, beginner-friendly explanations.
Potato – The Tanky Pug
Stats: HP 35 (very high), Power 7 (average), Defense 5 (high), Attack 6 (average)
Playstyle: A durable tank. Potato doesn’t hit very hard, but she’s tough to bring down. She slowly chips away at opponents and can heal herself.
- Basic Attack – “Spud Slap”: A normal smack. Damage: ~7 + d6 – enemy DEF. (Decent damage, nothing fancy.)
- Unique – “Couch Potato”: Potato heals herself for 1-6 HP (roll a die). She also gets +2 DEF until her next turn, making her extra tanky for a bit. (She skips attacking this turn to heal up.)
- Unique – “Spud Splash”: A big belly flop attack. Damage: a bit higher than her normal attack. If she rolls a 6, he knocks the opponent’s Defense down by 2 on their next turn (they’ll be easier to damage for a short time).
- Special – “Mashed Meteor” (1×): Potato drops a giant potato smash on the enemy. Damage: huge (roll 2 dice for damage instead of 1, and add both). No special effects besides lots of damage. (Use this once to deal a crushing blow!)
Strategy: Keep Potato’s HP up with Couch Potato whenever you’re getting low. Wear the opponent down with steady Spud Slaps and the occasional Spud Splash for extra
effect. Finish them with Mashed Meteor when the time is right. You win by surviving longer than the other pug!
Lily – The Tricky Pug
Stats: HP 30 (medium), Power 8 (good), Defense 3 (low), Attack 7 (above avg)
Playstyle: A fast, tactical pug. Lily uses tricks (stuns and quick hits) to control the fight. She can’t take heavy hits, so she tries to avoid them.
- Basic Attack – “Lily’s Lunge”: A quick leap and bite. Damage: ~8 + d6 – enemy DEF. (Solid damage for a basic attack.)
- Unique – “Puppy Eyes”: Lily tries to stun the opponent with cuteness. Roll 1d6: 4-6 = enemy is stunned (misses their next turn). 1-3 = no stun, but the enemy still takes a tiny 2 damage. (Either way, Lily doesn’t deal full damage this turn.)
- Unique – “Zoomies”: Lily dashes around and hits twice. She makes two attack rolls (using a smaller die for each hit). Overall damage is higher than a single hit. Occasionally, she might even get a third hit if she’s super lucky. (Great for maximizing damage, especially against a low-defense foe.)
- Special – “Cuteness Overload” (1×): Lily’s ultimate cuteness attack. Stuns the enemy automatically (they will skip their next turn) and also deals some damage (roughly a normal attack’s worth). (Huge to gain an advantage or save yourself in a pinch.)
Strategy: Use Puppy Eyes at crucial moments to try and stun the opponent (for example, right before they were going to hit you hard). Use Zoomies to deal a lot of damage when you get an opening, but remember each hit is a bit weaker against high defense. Cuteness Overload is your guaranteed stun – use it wisely, since it’s once per game. Don’t go toe-to-toe trading blows; instead, use your stun and speed to make sure the enemy gets as few turns as possible.
Bongo – The Berserker Pug
Stats: HP 25 (low), Power 10 (very high), Defense 2 (very low), Attack 5 (low)
Playstyle: A high-risk, high-reward brawler. Bongo can deal massive damage in a hurry, but he’s fragile. He often gambles with his moves – hoping to win before his luck or HP runs out.
- Basic Attack – “Bongo Bash”: A reckless strike. Damage: ~10 + d6 – enemy DEF. (Hits hard due to very high Power.)
- Unique – “Wild Swing”: A gamble attack:
- On a high roll (5-6), Bongo hits extra hard (adds +3 damage).
- On a low roll (1-2), Bongo hurts himself (takes 3 damage recoil) while still hitting normally.
- On 3-4, just a normal hit.
(So it can do big damage, but sometimes Bongo pays for it.)
- Unique – “Bongo Barrage”: Bongo goes berserk with multiple hits:
- Roll a die to see how many hits (1-2 = one hit, 3-4 = two hits, 5-6 = three hits).
- Each hit does damage = (Power – DEF).
(3 hits can be devastating; 1 hit is like a normal attack. After this, Bongo must catch his breath and can’t use Barrage on the very next turn.)
- Special – “Bongo’s Big Bang” (1×): Bongo’s all-out attack. Damage: ~10 – DEF + 2d6 (roll two dice). Very high potential damage. Also, if the two dice land on the same number (doubles), add +5 extra damage (jackpot!). (No self-damage on this one – just pure explosive output.)
Strategy: Bongo works best by overwhelming the opponent quickly. Use Wild Swing and Barrage when you’re feeling lucky or when a big hit could KO the foe. Be careful using Wild Swing if your HP is super low (the recoil might knock you out). Don’t hesitate to use Big Bang at a key moment – Bongo might not last long enough for a second chance. If your initial onslaught fails, Bongo can be in trouble because his defense is so low. So, all-in aggression is often the way to go. If you’re playing against Bongo, try to survive his flurry; if you can, he’ll likely be easy to finish off.
Mr. Twill – The Tactical Pug
Stats: HP 28 (moderate), Power 6 (low), Defense 5 (high), Attack 9 (high)
Playstyle: A defensive strategist. Mr. Twill doesn’t hit hard normally, but he has tricks to make his attacks count (using his high Attack stat and lowering enemy stats). He buffs himself to endure and outlast the opponent.
- Basic Attack – “Cane Whack”: A gentlemanly smack. Damage: ~6 + d6 – enemy DEF. (On the weaker side.)
- Unique – “Energizing Tea”: Twill buffs himself instead of attacking:
- +3 DEF until end of his next turn (so he takes less damage for one round).
- +2 Power on his next attack (hits harder next time). (No damage dealt on this turn, but sets him up strong for the next.)
- Unique – “Precision Strike”: A carefully aimed attack:
- Uses Attack stat (9) instead of Power for damage, so it hits much harder than his basic.
- Roll 1d6: on 4-6, ignore the enemy’s Defense for this hit (piercing strike). On 1-3, just a normal calculation. (Either way, usually better than a normal attack; with a good roll it’s great against high-defense foes.)
- Special – “Gentleman’s Gambit” (1×): Twill’s cunning finisher. Damage: ~6 – DEF + 2d6 (two dice). Also permanently reduces the enemy’s Power by 2 going forward. (So it hurts them and makes all their future attacks weaker – a huge advantage in a prolonged fight.)
Strategy: Mr. Twill wins by mitigation and smart hits. Use Energizing Tea at a moment when you can afford not to attack (e.g., you’re not about to die that turn) – it will make you very hard to hurt for the next turn and boost your offense after. Follow up a tea with Precision Strike to utilize that Power boost; hopefully you roll to ignore defense and really smack the opponent. Even without tea, Precision Strike is your best attack, especially against tanky enemies. Save Gentleman’s Gambit for when you can finish the opponent or when dropping their Power will ensure they can’t mount a comeback. Remember that your basic attacks aren’t scary, so you need to get the most out of your unique and special moves. If you keep your defense high and the enemy’s power low, you’ll win the long game.
Selah – The Balanced Pug
Stats: HP 30 (average), Power 7 (average), Defense 4 (solid), Attack 6 (average)
Playstyle: A versatile pug who mixes offense with support. Selah can heal herself and weaken the enemy, making her very steady in a fight. She may not deal huge burst damage, but she can sustain herself and chip away at the opponent steadily.
- Basic Attack – “Serenity Smack”: A calm strike. Damage: ~7 + d6 – enemy DEF.
- Unique – “Meditate”: Selah heals herself instead of attacking. Heal: 4-9 HP (roll 1d6+3). (She foregoes damage this turn to recover health.)
- Unique – “Harmony Howl”: An attack that also weakens the foe. Damage: ~7 + d6 – DEF (normal attack damage). Additionally, the enemy’s Power is -2 on their next attack (their next hit will be weaker). (Use this before an enemy’s big move to soften the blow.)
- Special – “Celestial Howl” (1×): A big life-steal attack. Damage: ~7 – DEF + 2d6 (two dice). Selah heals for half the damage this deals. (So it’s a strong attack that also gives her a significant HP boost – great comeback move.)
Strategy: Selah’s strength is staying alive. Use Meditate when your HP is getting low and you don’t need to attack that very moment (be careful not to heal when the enemy could potentially finish you off immediately after). Harmony Howl is very useful to reduce the enemy’s damage next turn – for instance, if you suspect they’re about to use their Special or a high-damage move, hitting them with Harmony Howl first can save you a lot of pain. Meanwhile, you still do some damage with it. Over the course of the game, alternate between attacking and healing as needed to keep your HP in a healthy range. When things get tough or the timing is right, use Celestial Howl to swing the fight – you might deal a big chunk to the opponent and heal yourself in the process, turning a losing situation into a winning one. Selah doesn’t usually win quickly; she wins by outlasting the opponent, so pace yourself and don’t panic if the fight goes a bit longer.